| Tomb
Raider 4.5 Engine Patcher English | German |
|
Main page
Downloads
User's Guide
DRACO patches
eSSe scripting
FAQ
Anti-TREP
Bugs memorial
Preset archive
Contact authors
DRACO custom patch module reference (updated 31 Aug 2010)
Note: This document now contains all information about custom patches that was previously available in User's Guide.
Table of contents:
1. Overview
2. How to use custom patches?
2.1.
Custom patches reference
3. How to create custom
patches?
3.1. DRCMerger
Two years have passed since first patches for TR4 engine appeared on the Net. Almost every month something completely new is discovered, and it's very hard to handle all these new options with just recompiling one utility over and over again. If you will look at TREP's history, you will see that in the middle of 2006, new versions were released almost every week. The reason for such extremely frequent updates is continous researching of TR4 engine by numerous people around the world. That is, in the past, every new option was hardly integrated into TREP's code and there was no possibility for altering patching routines and adding new patches without recompiling main TREP's executable.
So, when in the end of 2006 amount of various patches and new options grew pretty fast, it becomes obvious that now we need something even more flexible — a module which will allow to create ANY patch with ANY parameters without modifying main TREP code.
DRACO module's purpose is:
- Minimize download times and also liquidate time gaps between developing and releasing patch. Think like about antivirus bases or anti-spam bases — you only need to update small base files to let your antivirus program know new modifications of viruses, you don't need to download new antivirus's installer every week. Same thing with DRACO module — you don't need new TREP versions for any new feature (however, some critical bugfixes and new features still can be added only with new version of TREP), you only need small 60 kb file which will contain all new updated options and patches. Also DRACO module allows you to modify and update patches VERY FAST.
- To allow you creation of your own new patches. If some day you will learn assembly language or find interesting parameter with OllyDbg, you can immediately create custom patch for TREP, and it will appear in TREP's custom patches window just like any other patch. That is, you can create a lot of your own custom patches and dynamically change their values, position, modify offsets on the fly, add parameters etc.
That is the reasons why DRACO called Dynamically-ReplaceAble Code Organizer — it allows you to add, delete, turn on, turn off, modify and change all custom patches.
2.: HOW TO USE CUSTOM PATCHES?
Layout of DRACO module is pretty simple:
On the left side is the patch list. You can enable or disable any patches that you need or not need. Note that when you're selecting any patch, right side of the window will change. Right side is the patch info box, and it may contain useful info about patch, like patch's name, description and so on. Also, if selected patch allows you to modify some dynamic parameters, you will see extra description and text field in the bottom side of info box.
In some circumstances you may find out that patch's title in the info box colored in red, and some strange red icons appeared on the right side, like this:
Patch's
title colored in red!
It means that you have not enabled some options that is required for this patch. Each red icon has its own meaning, which you can learn by pressing onto it (as always, mouse pointer will turn into Mickey Mouse's hand when you'll hover it over corresponding icon):
![]() — you should turn on «Extend
tomb4.exe size» option in main TREP window.
— you should turn on «Extend
tomb4.exe size» option in main TREP window.
![]() — you should turn on «Remap
particle buffer» option in main TREP window.
— you should turn on «Remap
particle buffer» option in main TREP window.
![]() — you should turn on «Remap
scene memory» option in main TREP window.
— you should turn on «Remap
scene memory» option in main TREP window.
![]() — you should turn on «Enable
advanced savegame management» option in main TREP window.
— you should turn on «Enable
advanced savegame management» option in main TREP window.
![]() — you should activate some extra
custom patches to make current custom patch work. Simply click
onto this icon, and you'll see a list of required custom patches.
— you should activate some extra
custom patches to make current custom patch work. Simply click
onto this icon, and you'll see a list of required custom patches.
DRACO module buttons:
load set: loads
predefined patch set (file that contains info about patches and patInch data).
save set: if you've edited/created some patch (to learn
more about this, refer to Custom Patch Reference bundled with TREP), you can
save patch set here.
defaults: will reset all patches
to disabled state and also reset all patch parameters to default value.
proceed: close DRACO custom patches module and return to
main TREP window.
Search function: DRACO
module have built-in search function. You can use it if you have too many patches
in the list and want to jump to specific patch. To use search, simply type
some expression into search textbox under custom patch list and
press ENTER or click small magnifier icon on the left. If there
are any patches with desired expression in their name, you will
be immediately pointed to nearby matching patch. Each time you'll
press ENTER or click magnifier icon, you'll be redirected to next
matching patch, and if there are no any patches that can match your
criteria left, you'll see [sequence not found] message. To
begin search from the beginning, press small rounded arrow icon
once.
Also you can use hotkeys to search through patch list:
F2 —
Search from the beginning
F3 — Search next.
Using parameters
Sometimes custom patches will allow you to change one or more dynamic parameters with it. It appears like this in patch's description box:
In this case, patch allows you to specify three different parameters for displaying enemy state on game screen. You may ask: «what the heck? I only see one parameter, not three!» But wait a little. Do you see that parameter's description is UNDERLINED? That's that! Just move mouse pointer to parameter's description, and you will see that it will change to Mickey Mouse's hand. Now click it, and — voila! — three parameters at your service!

Can
you see five different parameters that you can select from parameter
list?
If there is only one parameter in selected patch, parameter's description label won't be underlined, mouse pointer won't turn to Mickey's hand and you won't be able to bring up parameter list by clicking on parameter's description label.
Also note small round arrow picture at the right side of parameter's textbox. Note that mouse pointer will again turn to Mickey's hand. Click on it and you will see that parameter's value resetted to defaults!
***
2.1.: Custom patches reference
In this section we will try to describe most useful custom patches currently available. If you don't see some of these patches in your custom patch list, be sure you've got latest custom patches file.
Ammo counter
Can you
understand
why ammo counter was removed from TR4-TR5 engines? No one knows. But now... Prepare... AMMO COUNTER
IS BACK! With improvements! Now ammo counter have two modes — normal
and critical, just like HP or AP bar! You can set font effect ID
for each mode (for ex., you can create red critical ammo counter
and yellow normal ammo counter), and also ammo value threshold between
these two modes!
Ammo
counter: normal mode (left) and critical mode (right)
Also ammo counter will work, if you've enabled limited pistol ammo. If you've unlimited ammo for some weapon, ammo counter won't show.
Another distinctive feature of this updated ammo counter is that it can show current flare's lifetime, if Lara holds one. Note that in this case ammo counter's format will change to counting-down MIN:SEC format, i. e. you will see how much time left until current flare will die.
Ammo counter: shotgun
divider
It's an add-on for previous patch. In case you're
using MP5 or M16 in shotgun slot, you can disable 6x divider, so
counter will show native ammo value, not divided by 6.
Enable in-game timer
Shows
overall game timer in top right corner.
Enable GAME OVER
Enables
blinking GAME OVER text when Lara dies. This feature was never introduced
in full PC versions of TR4 and TR5, but supposedly it was used in
some demo versions and console versions.
Disable blinking text
Disables
fading text effect, replacing it with constant colour. You can change font brightness
with parameter.
Always exit statistics
When
user will press ESC key in statistics screen, he will be thrown
back in game immediately, bypassing PAUSED screen. VERY useful if
you're gonna use SHOW_STATS flipeffect command to show final
game or level statistics in the end of your game.
Add [Kills] to statistics
For
some reason, TR4 have no «Kills» entry in statistics
screen. This patch will return kills entry to statistics. Note that
text «Kills» is hardcoded, so you can't change it with
script file. Also you must remember that TR4 engine ignores some
enemies when calculating this value (for ex., horseman) and
resets this statistics entry with every new level.
Add [Hits] to statistics
Adds
new, never seen before accuracy statistics entry. It will appear
as additional value after «Ammo used» entry.
Disable quicksave
when game is over
Disables F5 savegame hotkey when Lara is
dead. You may ask: «what the heck is this?» Well, then,
you're lucky that you've never tried to smash your keyboard in anger
after occasional saving over existing savegame when Lara was
already dead! Fortunately, this patch can preserve your mental health
by disabling savegame hotkey when Lara have died.
Fix flyby hotkey
bug
Fixes nasty bug that allowed Lara to draw her guns when
flyby is active. VERY useful when you're creating cutscenes.
Fix flyby legend
draw
For some reason, Core disabled legend strings during
flybys. This patch, indeed, allows you to use legend strings
with flybys. Note that you can use ANY flyby bars height with it,
since legend string will automatically move above bottom flyby bar
(it's really cool effect when legend string moves up synchronously
with flyby bars, no?).
Disable add-on gun
sound
Removes additional EXPLOSION_1 sound, which is
playing when Lara uses pistols, uzis, revolver or shotgun.
Disable sentry gun
flame attack
Forces sentry gun to use gunfire attack even
on narrow distances.
Old-skool teeth spikes 1
Enables
spit animation and sound, when Lara jumps onto teeth spikes.
Old-skool teeth spikes 2
With
this patch Lara can safely walk through teeth spikes, like in earlier TR1-TR3
games.
Old-skool teeth spikes 3
Disables
spikes sound if spikes are sticked out constantly (OCB 16+). Allows to avoid
spikes sound playing after savegame reloading.
If you want to create
Coastal Ruins-like «hidden» teeth spikes, you should use OCB 36 instead
of OCB 20, or stick out sound won't play. (In fact, Coastal Ruins' teeth spikes
has exactly 36 in its OCB field.)
Teeth spikes —
kill enemies
When this patch is activated, teeth spikes object
will be able to kill enemies! You can use it to create some puzzle
which will require Lara to kill enemy without using her guns.
Wireframe mode
Nifty and
useless patch that will set almost all geometry and sprites to wireframe mode.
You can use it to debug your level or to inspect internal TR4 clipping.
Single gun with PULSE (left)
Disables
left pistol and UZI, if you've set PULSE=ENABLED in your script file for corresponding
level. It can be useful if in some leves you're using other character, who has
single-gun armoury (instead usual Lara's twin-guns). For ex., if some of your
levels are using Kurtis as a playable character, you can create single-gun mode
for his levels only.
Bugfix: poisoned darts
This
patch will fix nasty TR4 engine bug and will allow you to use poisoned
darts, just like in TR3.
Static shatter: limiters
This
patch with two parameters will allow you to define UPPER
and LOWER limit of static meshes' IDs. With it, you can create much
more static shatters.
Static shatter: alternate sound
This
patch will divide static shatters into two groups. One group will use default
sound when shatters, and other group will use custom sound.
Parameters:
- Alt. sound threshold: specifies if default or alt. sound will be used. If mesh ID is less than threshold, default will be used, otherwise alternate sound ID will be used.
- Alt. shatter sound ID: sets custom alternate sound for second group of static shatters. You can use some unused sound index, add alternate shatter sound in your SOUNDS.TXT file and then use both these sounds for different static shatters. For example, now you can have BOTH breakable wood crates that will produce wood sound, and breakable windows that will produce shattered glass sound.
Replace Wild Boar AI with Troops
AI
Replaces Wild Boar AI with Troops AI. Please note that after this
patch Wild Boar slot will share all animations with Troops slot.
Unlimited air with STARFIELD
If
your script file will contain STARFIELD=ENABLED entry for certain level, it
will set unlimited air supply for Lara. With this patch, you can create
underwater episode with Lara using Scuba Gear or Extreme Depth Diving Suit
and so on.
Relocate fog bulb buffer (test)
Test
patch to increase maximum amount of simultaneously shown fog bulbs from 5 to
21.
Relocate dynamic lights buffer
(test)
And now… Finally… Prepare… One Of The Most Nasty TR4 Bugs
Ever… The Flare Bug! What do you know… Now you can fix it! In fact, this
patch will increase max. amount of dynamic lights from 32 to 127, so you can
use much more flame emitters / flares / light objects at the same moment.
Relocate rope buffer (test)
TR4
engine definetly isn't TR: Legend engine. It allows us to use only FIVE ropes in each level. If you will
try to use more than 5 ropes, level will immediately crash, even if you have
no any other objects in your level. So this patch will relocate rope buffer,
and you will be able to use up to 30 ropes.
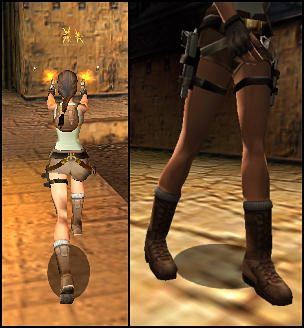
Pigtail: gravity
Simply
sets gravity for pigtail. You can set it lower to give Lara's pigtail more «air»
and make it look more fluid and smooth.
Extended loading bar X position
This
option, if active, will override corresponding Bar Customizer's setting
and will allow you to use bigger X coordinates for loading bar. In other words,
you can shrink loading bar and then move it to the center of the screen, so
it will look like loading bar in TR5.
Disable baboon magic death
If
you don't want any fantasy and otherworld chit-chat in your levels, you can
remove orange explosion after baboon's death. After this, he will die like any
other normal creature in TR4 (except tiny and barely noticeable square that
will appear where explosion epicentre should be).
Enable standable pushables (beta)
This
patch allows you to use good old TR1-TR3 climbable pushables. But there are
some notable differences. First of all — now you can stack these pushables!
For example, you can create a pyramid of pushables, and Lara should somehow
re-arrange this pyramid to access new area or to jump over some nasty trap.
Also there is no «lower pushable» bug — unlike TR1-TR3, Lara won't
be able to push/pull lower block until all upper blocks are removed.
Second
new feature — now you can DYNAMICALLY CHANGE pushable's
height! It means that you can create not only classic 4-click cubical pushables,
but also 2-click and 3-click mini-pushables, as well as massive 5-click, 6-click,
8-click etc. pushables! Imagine that Lara now can move some tall pillars
or, in contrary, squished platforms — now you have much more possibilities
for various puzzles!
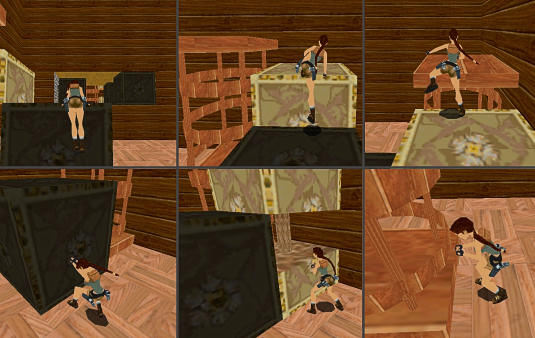
3
different pushables in action: 4-click (classical), 6-click and 8-click.
You must set each pushable's
height with OCB field. Value is raw global coordinates value, i. e.:
?
To create classical 4-click pushblock, you must enter 1024 in OCB field.
?
To create 2-click pushable (half of classical pushblock) you must enter 512.
? To create 6-click tall pushable pillar, you must enter 1536.
?
And so on…
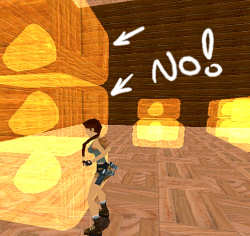
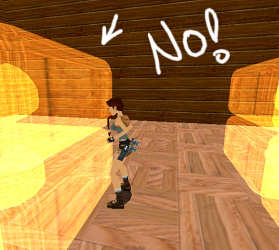
Make sure that collision box is correct, or else Lara will refuse to push/pull these pushables.
If you want to have both classical pushblocks and «modern» TR4-TR5-like «smooth» pushables without block collision — don't worry! You still can use TR4-like pushables along with classical pushable blocks. Just set OCB to 0, and Lara will treat this pushable as always in TR4 engine. Unfortunately, you CAN'T use both these types of pushables on the same floor level, but you indeed CAN use them in different areas, where they won't interfere.
BUG WARNING: TR4 engine contains really nasty bug which locks-up pushable and denies to push/pull it and also messes up floor collision data. When Lara grabs a block in preparation to push/pull it, you can VERY QUICKLY push forward or backward key and then IMMEDIATELY unpush both action and direction key. In about 2/3 of all cases, Lara won't push/pull block, and it will occasionally «lock up» and Lara won't be able to push pull it. Also, if you've activated climbable pushable patch, it will result in messing up floor collision data. Unfortunately, the nature of this bug is very well integrated into code, so it's not possible to fix it now.
Now let me tell you something about pushable stacking. Theoretically, you can stack ANY type of pushables in ANY combination with ANY amount of rows. Here's a few examples how you can create really challenging puzzles with different types pushables in different combinations:
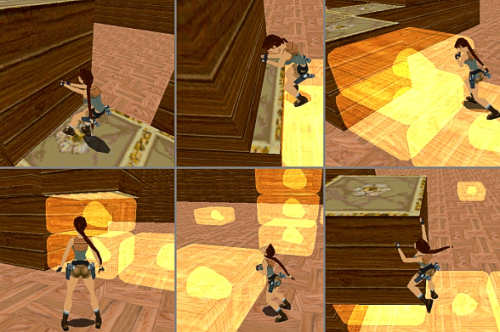
Combined
puzzles using pushables with various collision heights (in this case — 2-click and
4-click)
And in these cases Lara will deny to pull/push lower pushable, until all upper pushables are removed. Note that this trick was not possible even in TR3:
Lara
won't pull or push lower pushable, until two upper pushables are removed.
Lara
won't pull lower pushable, until upper pushable is removed.
Quick crawlspace climb
If
you remember TR5, maybe you also remember that there was no need to press DUCK
button when climbing into crawlspace. This patch will act in the same way, allowing
you to climb into crawlspace without pressing DUCK button (i. e. Lara will automatically
climb into crawlspace in «duck» state).
Enable ladder crawl (beta)
Another
patch for enabling TR5-specific move. In TR5, when Lara is climbing up the ladder
and there is crawlspace above, she will immediately crawl into crawlspace. This
patch will allow you to use same trick, but with one difference — you must hold
action button until crawl animation will end. To make it work, you must rip
animation #473 from TR5 level file, then paste it into any new animation slot
in WadMerger and specify corresponding animation number in patch's parameter
textbox.
Enable crawlspace jump
And
another TR5-specific move — jumping out from the crawlspace facing deep pit.
Maybe you already know that all revised TR4 wads already contain this animation
as #421. Perhaps, Core Design had plans to implement this movement in
TR4 engine, but delayed it until TR5. This patch will indeed enable this trick, and
Lara will be able to flip forward from the crawlspace with jump key. Note that
you can use this patch with ALREADY EXISTING CUSTOM LEVELS which contain unmodified
animation #421, and therefore enjoy this new move without altering level
files!
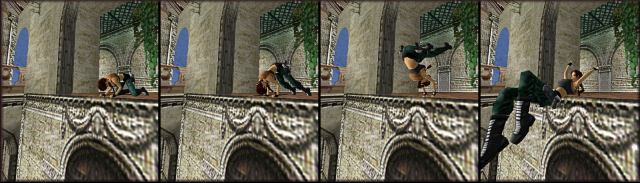
Crawlspace
jump in Horus' Neon God. No level flie altering needed!
Parameters:
- Pit deepness threshold: specifies minimum pit deepness to perform this action. Minimum is 512 (2 clicks).
- Crawlspace jump animation #: custom animation number.
Enable crawlspace roll
This
fancy move never was introduced in PC versions of TR4 and TR5, despite
the fact that all revised TR4 wads contain this animation sequence
(number 218-219-220) and it's possible to use this trick on PlayStation
versions. Anyway, now you
can use this move by pressing SPRINT key when Lara is in duck stand
state. Also note that you can use pistols, uzis and revolver with
this move, so it's now possible to shoot when moving in crouch position.
As
with previous patch, you don't need any extra custom animations
for it, because all revised wads and custom Lara objects already
contain this move. Just enable this patch, and you will enjoy this
brand new move in old custom levels!

Crawlspace
roll in Christoph's Jade Empire. No level file altering needed!
Parameters:
- Animation #: default animation number. You shouldn't change it, as long as you won't decide to rearrange this already existing animation sequence.
- Collision check distance: Unfortunately, TR4 calculates collision incorrectly, so when Lara will try to roll nearby some tall block, she can occasionally find herself all the way up on it! To solve this problem, you can increase Collision check distance parameter (values about 800-1024 should do fine), but then Lara will deny to roll when facing walls at different angles.
- Max. collision height thresh: specifies maximum block height that Lara can roll onto. By default it's 1 click (-256), but you can decrease it to allow Lara roll onto higher platforms.
- Min. collision height thresh: specifies minimum block height to roll onto. By default, Lara can roll from one-click platforms, but you can increase it to allow Lara roll into lower pits (like 2-click and such).
Enable crawlspace pickup
One
more unused action in TR4 engine — picking up items when crouching
on all fours. Once again, this animation was already included into
all TRLE revised wads, so there's no need in custom animation. Just
enable this patch, and Lara will be able to pick up items without
changing her crouch state!
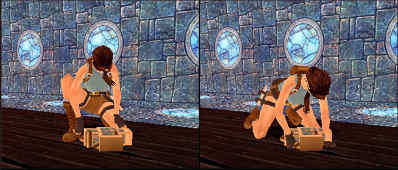
LEFT:
standard pickup animation. RIGHT: crawl pickup animation on all
fours.
No level file altering needed!
Allow ladder-monkey animation
(beta)
Allows you to use new «ladder to monkey bars»
movement. You must create new custom animation that will rotate
Lara for 180 degrees and move her from the wallclimb state
to monkeyswing state. Also note that if you will use this patch,
you'd better don't use slanted monkeybars above ladders, because
Lara will deny to move from ladder to monkeybars if there is large
gap between her hands and ceiling level.
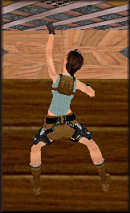
Ladder-monkey
animation by GeckoKid
Allow water-ladder animation
(beta)
Allows to use new «water surface to ladder»
movement. As with previous patch, you must create custom animation
for it and specify its number.
Parameters:
- Ladder height threshold: specifies minimum height for ladder to climb onto. Default is -1280 (5 clicks).
- Animation #: custom animation number.
Monkeyswing: 180° turn (stop)
Enables
usage of ROLL key when Lara is hanging still on monkeybars. When
ROLL key is pressed, specified custom animation # will play, allowing
you to create fast 180-degree turn on monkeybars. Here is the example
of such animation:
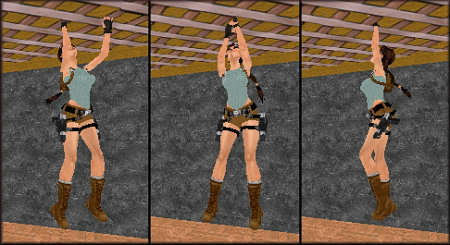
180-degree
monkeybars turn by Titak
Monkeyswing: 180° turn (move)
Enables
usage of ROLL key when Lara is moving forward on monkeybars. Usage
similar to previous patch, but in this case you can specify other
animation # and therefore create two different animations for
stop and move monkeyswing states. Or you can type
same animation # as with previous patch, and this animation will
play in both cases.
Ledge climb control
Patch
created by Harly Wuson
Allows
to assign two new state IDs for «hanging on ledge» state
with jump and down keys. With this patch you can create ledge hop
move, like in TR: Legend.
Parameters:
- (Jump) state ID: State ID for jump key.
- (Down) state ID: State ID for down key.
Exploding enemies
Allows
you to specify five different enemy slots to explode after death,
like mutants in TR1's Atlantis. If you want to assign explosion
death to less than five enemies, just equalize some of the parameters.
Jeep / motorbike
water explosion
When jeep or motorbike falls into the water,
it explodes. Unfortunately, sometimes it produce occasional «frozen
Lara» problem, when Lara's model is stuck in «driving»
state with no HP left. This patch will also shatter Lara to meshes,
so this problem won't occur at all!
Rolling ball: smash
and kill
TR4 rolling balls are pretty strange. Each contact
with rolling ball will result in immediate Lara's death, but all
of the enemies can safely walk through it! This patch fixes this
problem and allows you to destroy enemies with rolling balls. Just
place 20 baddies or SAS in the narrow corridor and feed them
with only one rolling ball — tons of blood guaranteed!
Also this
patch will turn on occasional shatter for shatterable statics
if rolling ball will roll through them. Why «occasional»?
Because it will shatter only specific shatter meshes. Test it thoroughly
and you should get the idea how to place your shatter static so
it can be shattered by boulder.
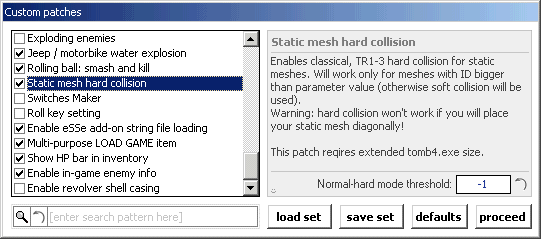
Static mesh hard
collision
This is the one of the most requested features
from early TR games (along with weather and climbable
pushables). Of course you know that in TR1, TR2 and TR3 engines
all static meshes produced so-called «hard» collision
— when Lara collides with static mesh, she immediately stops
and denies to run/walk/jump until you'll turn around.
This method
was replaced in TR4 and TR5 engines with «smooth» collision
— Lara continues to run into static mesh and she's able to «ooze»
into object after few jumps. It makes static meshes almost ineffective
when creating limiting fences, borders, pillars etc., because Lara
can run through it. Also it is quite unnatural when Lara is
running into some object in your level.
So this patch returns
TR1-3 static mesh collision method and allows you to bring back
old TR1-3 memories, when any encounter with static mesh was much
more painful for Lara.
For example, let's take latest Bojrkraider's
level — The Experiment 3 part 2. This level uses LOTS of static
meshes to form room interiors and architecture, but by Lara's behaviour
you easily can distinguish real room geometry from artificial static
mesh geometry. This technical flaw kills a lot of any level's atmosphere
and also allows Lara to merge into static meshes. After applying
this patch, all static meshes are almost IDENTICAL to wall collision,
and it makes level's overal feeling much better.
Collision
behaviour in Bojrkraider's Budapest Museum
But unfortunately, there
are two notable bugs, and both of them are not specific patch problems,
but related to engine's methods to calculate collision. First of
all, you CAN'T place low static meshes right at the wall!
If Lara will jump onto this static mesh, she will emerge into wall
and player will need to restart level. Always leave small gap between
static mesh and wall, so Lara can walk around it or correct mesh's
collision box to deny Lara from jumping over it!
Second bug —
you can't use diagonal
placement of non-symmetrical static meshes with this collision method, because
collision will calculate incorrectly. To overcome this problem,
you can use invisible dummy static meshes or use both types of collision (TR1-3 and TR4-5) in single
engine. To do this, modify Normal-hard mode threshold
parameter. All static meshes with ID BIGGER than parameter value
will contain hard collision, and all meshes with ID LOWER or EQUAL
to parameter will contain soft collision. For example, if you've
specified 5 in parameter field, all static meshes with ID prior
to 6 will use soft collision, and all other meshes will use hard
collision.
But there are also some very good news. Unlike any old TR games, this patch's distinctive feature is fully-functional bottom static mesh collision. What does it mean? Well, now you really can limit room's ceiling with statics! For example, if there is a lamp or furniture on the top of the ceiling, Lara WON'T JUMP INTO STATIC MESH, but instead will smash, like with any room ceiling! It makes hard collision even more realistic and allows you to create ceiling collision not related to old-skool TR grid system!
Switches maker
Patch
created by Harly Wuson
This
enormous patch allows you to create things never seen before in
TR4 levels! First of all, it allows you to use TR5-like method when
assigning proper animations for switches by extending possible OCBs
(from 3 to 7). Now you can create small lever pull animation, small
push button animation, wheel animation etc. WITHOUT RE-ASSIGNING
ANIMATIONS in WadMerger! But it's not all. Also this patch allows
you to assign ANY animation to ANY switch! Just remember that all
OCBs after 7 will be interpreted as turn-on animation numbers.
As for turn-off animation numbers, they're calculated by adding
1 to OCB number, i. e. if you've set OCB 456 for switch, Lara will
play animation # 456 when turning switch on and animation # 457
when turning switch off.
Parameters:
- Switch ON (OCB 1-6) Anim #: allows to change OCB 1-6 turn-on animation numbers.
- Switch OFF (OCB 1-6) Anim #: same as above, but for turn-off animation numbers.
Roll
key setting
Patch
created by Harly Wuson
Allows
to assign different animation numbers for ROLL and UP+DOWN keys.
This way you can have two different turn around animations in your
levels.
Enable
eSSe add-on files loading
After applying this patch
TR4 engine will begin to load extra strings file called STRINGS2.DAT (similar
to ENGLISH.DAT, but without encryption) and extra script file SCRIPT2.DAT (also
without goddamn encryption) that can be later used for
various purposes. For example, diary feature (see further) will
require this patch, as it uses A LOT of custom strings for diary
records. Also, most recent level-specific DRACO patches will
require extra script file, so this patch is necessary for these
needs.
Both STRINGS2.DAT and SCRIPT2.DAT files are compiled using utility called
eSSe that is available in downloads
section. To
edit extra script and strings file, you can use any text editor.
Also
see Advanced
scripting with TREP
section.
Multi-purpose
LOAD GAME item
This patch will convert LOAD GAME item into
a TR1-like passport item with unified LOAD/SAVE functions. But most
important thing is that this patch will allow you to use... Prepare...
Are you ready? DIARY FEATURE! Finally! Now you can create LOTS of
diary records for every level and carefully guide player through
your level's story and enrich your level's plot with text-based
hints and commentaries! Since ages old-skool TR games were so non-informative
and, therefore, plot-unwise, that even Phil Campbell complained
in TRLE manual that he needed to use complicated tricks to guide
player through story. But now, with diary, you can support player
with ANY amount of text information for ANY game event!
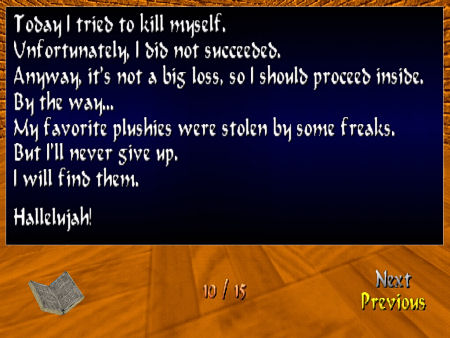
Diary
screen
Parameters:
- Non-active menu font effect ID: sets font effect for non-active diary menu entry.
- Active menu font effect ID: sets font effect for active diary menu entry.
- Diary counter font effect ID: font effect for diary records counter.
- Diary main text font effect ID: font effect for main diary text.
- Animated background brightness: specifies brightness for ultra-cool blue animated diary text background.
Show
HP bar in inventory
If you remember, in TR1-TR3, HP bar appeared
in inventory if inventory pointer hovered over large or small medkit.
For some mysterious reason, Core removed it in TR4 engine. This
patch will show HP bar in inventory again, like in good old TR1-TR3
days.
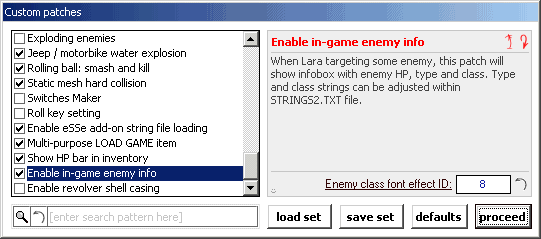
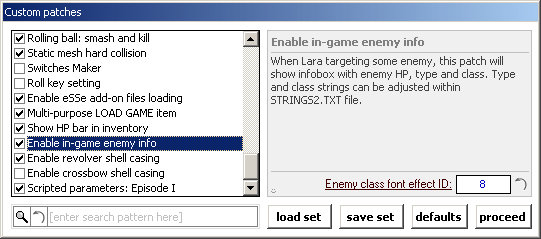
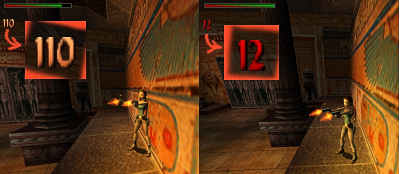
Enable
in-game enemy info
Nifty patch that will allow you to see
current auto-targeted enemy's overall and start-up HP, as well as
his name. Note
that when some enemy will pick up medkit (like first Baddy
1 in TUT1 level), his HP will indeed increase, and if you'll shoot
him with poisoned crossbow bolt, his HP will continously decrease!
So this way you now can trace each enemy's HP, which makes gameplay
more informative and allows you to use more strategic approach when
fighting enemies.
Enable
revolver shell casing
Simple patch that will enable shell
casing for revolver weapon, like for Desert Eagle in TR3.
Enable
crossbow shell casing
Same as above, but for crossbow weapon.
Scripted
parameters: Episode I, II & III
This patch will turn on first series
of level-specific parameters that can be set up with add-on script
file (read eSSe
scripting document to learn more).
Enable
multi-purpose bar
Enables extra multi-purpose bar that acts
like cold water bar in TR3. To begin decrease this bar's value,
use ACTIVATE_BAR flipeffect editor command — since you'll use this
command, multi-purpose bar will be placed in active state and
its value will begin to decrease. Then, if bar value reached zero,
Lara's HP will start decreasing. To increase bar value again, you
must use DEACTIVATE_BAR command in filpeffect editor. In this case
bar value will slowly increase until it is reached its maximum
— and then it'll disappear from game screen.
Please note that
latest update (14 April and later) of DRACO module WON'T ALLOW
YOU to edit bar's colours and increase/decrease values anymore,
because now it can be adjusted with SCRIPT2.TXT
and eSSe.
Parameters:
- Width: bar's width.
- Height: bar's height.
Automatically
create \SAVE directory
This small fool-protection patch
will prevent game crashing when user have deleted \SAVE subdirectory
and trying to save. This extra \SAVE directory is needed for
advanced savegame management, so this patch will re-create this
subdirectory automatically if it does not exist. Also this patch
will help if you're releasing custom level and don't want to include
any empty folders with it. In this case, \SAVE subdirectory also
will be automatically created at the first start-up of your game.
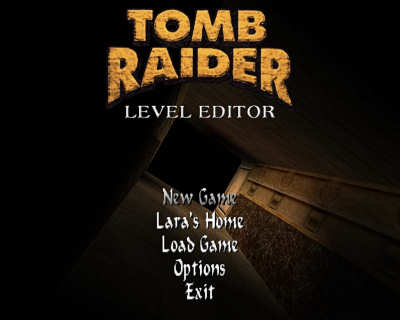
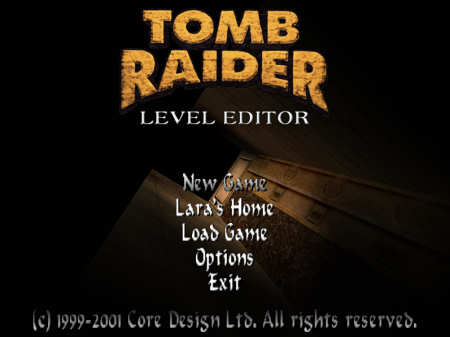
Add
Lara's Home entry to title menu
Core Design removed Lara's
home from both TR4 and TR5, effectively integrating tutorial into
main game (Cambodia in TR4 and Opera Backstage in TR5). But sometimes,
when you want to bring back TR1-3-like Lara's Home independent menu
entry or when you simply want to create a game with two independent
scenarios, you can use this patch. When used, it will add extra
menu entry to title screen. When you'll click on it, it will load
specified level number.
You must note that «Lara's Home» text is taken from STRINGS2.TXT file, not from SCRIPT.TXT or ENGLISH.TXT!
Parameters:
- Lara's Home level #: this parameter specifies level number for Lara's Home menu entry.
- Original game level #: main game will start from level #1 by default, but there you can set it to 2 or anything else, and then use level #1 for Lara's Home instead.
- Active entry font effect ID: sets font effect for activated Lara's Home entry.
Enable
Bink videos playback
Finally! It's there! Yes, your eyes
aren't lying to you. Now you can use BINK FULL MOTION VIDEOS
in your game! Read carefully: you can use videos now! First
of all, now you can create FMV intro for your game that will play
just like classic TR1-TR5 intro, but what is more interesting —
you now can call FMVs with FLIPEFFECTS! No need to assign extra
lines in SCRIPT.TXT file — you just use new PLAY_FMV [file
number from 0 to 99] FURR command and enjoy quick and easy way
to implement classic videos into your game!
There are two things
to remember. First — don't forget to put binkw32.dll file
into TRLE folder, or executable won't launch. There are quite large
amount of binkw32.dll versions, but every recent version should work normally
— for example, you can borrow one from TR: Anniversary directory.
Don't use old binkw32.dll versions from TR4 or TR5, because
they lack support for several sound compression formats.
Second — put videos into /fmv subfolder and call them like
this: fmv00.bik, fmv01.bik ... fmv99.bik . In other words
— just like in TR4.
Main question is: «How do I create BINK VIDEO files?» And here is the answer: go to Bink Video homepage and download The RAD Video Tools for free! This tool can convert almost any contemporary video format into BINK video and allows you to select A LOT of options. The ultimate drawback of .bik format is a VERY slow encoding speed (almost 4-5 times slower than ordinary DivX/Xvid encoders), but the quality of resulting bink file exceeds all quality standarts! So be patient, and you will be able to use one of the best video formats in your game.
Parameters:
- Intro FMV number: this video file will be used as start-up introduction. For example, you can place into /fmv subfolder good ol' Eidos/Core logo intro, so you will enjoy watching it every time when launching your game. Or you can replace it with your own intro or logo, or combine both in single file... By default it's set to 0, so fmv00.bik will play, but you can change it to any value from 0 to 99.
- Video window horizontal resolution / Video window vertical resolution: changes video window size. Default is 640x480, like in TR4 and TR5. If your videos are 800x600 or higher, then you should change these parameters to fit resolution. However, i don't recommend you to use resolutions higher than 640x480, because filesize will be too large (and it won't be good for custom level hosted on the Net, not distributed on CD or DVD).
Use
Position Changer via WHITE_LIGHT
Patch
created by Tomo
By
numerous requests, this extremely useful patch was translated into
TREP's DRACO module. As you may already know, it adds Position Changer
functionality to the WHITE_LIGHT object, but in this patch's version
it acts a bit different. To use Position Changer, you must put OCB
666 for corresponding WHITE_LIGHT object. With all other OCBs it
will work like ordinary white light.
One VERY IMPORTANT NOTE: DO NOT use this patch with Tomo's TRGE executable, because it may result in code conflict and game will crash! Please use DEFAULT, XP-patched tomb4.exe back from 2002! You may download it here.
Enable
weather
Patch
created by Tomo
It is very sad that Tomo has stopped any work on TR4 engine
patches. I continue to wonder how he managed to import TR5's
weather code into TR4 engine, because it should be very difficult
and time-consuming to search and compare all constants, addresses
etc. in both engines. As for me, i've never succeeded in this job,
no matter how i tried. So, as with previous patch, all main code
was directly translated from Tomo's executable into DRACO patch
module. Indeed, there are few improvements and optimizations in
this version. First of all, now you can get rid of oval-shaped snow
bug and see normal TR5-like snow. Second, rain was too faint and
hard to see before, but now it is looking like TR5-rain. Third —
you now can use BOTH rain and snow AT THE SAME TIME! And another
bug is fixed, which prevented rain and snow from using in title
flybys and occasionally crashed game during certain level jumps.
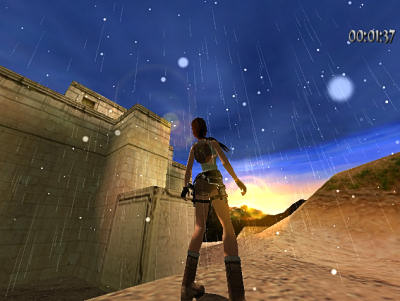
Rain
and snow are activated simultaneously by using CHANGE_WEATHER
3 command.
To set weather, you need use new FURR command called CHANGE_WEATHER with extra parameter which specifies weather type (0 goes for nothing, 1 goes for rain, 2 — for snow, and 3 — for both rain and snow at the same time). For example, CHANGE_WEATHER 0 resets weather, and so on.
Parameters:
- Primary particle density: Here you can change density for both rain and snow. Larger numbers will create denser rain/snow, but don't set it too high, remember that rain and snow eats A LOT OF PARTICLE BUFFER!
- Secondary particle density: Should be edited in conjunction with primary density.
One VERY IMPORTANT NOTE: DO NOT use this patch with Tomo's TRGE executable, because it may result in code conflict and game will crash! Please use DEFAULT, XP-patched tomb4.exe back from 2002! You may download it here.
Add
keypad into MAP slot
One more good thing in TR5
was keypad lock, which required certain numerical combination to
be unlocked. Now you can use almost the same thing in custom levels!
This patch enables new, written from scratch, keypad, which differs
from TR5 keypad in certain ways. First of all, it is rendered differently
(in TR5, keypad was rendered as 3D mesh, there you will see 2D representation
of keypad). Also this keypad allows you to use same digit multiple
times — i. e., unlike TR5, you can use combinations like 5225
or 1114.
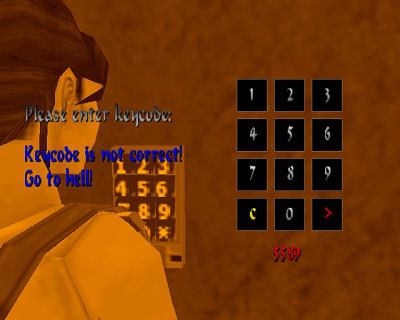
Enter
keycode combination screen.
To use this keypad lock, use MAP slot for keypad object (you can get one from TR5 wad, or create mesh from scratch). Place MAP object in your level and write desired numerical combination into OCB field. Then, use your keypad like ordinary keyhole. In game, however, keypad won't require any keys, and will bring «Enter combination» screen instead. If user will enter wrong combination, error message will pop up (just like in the screenshot above), and keypad screen will automatically close after some time. If user will enter correct combination, another message will pop up, keypad screen will close itself, and underlying trigger will be activated. Each keypad can be used multiple times.
All text messages and labels for this patch are taken from STRINGS2.TXT file.
Parameters:
- Prompt message text effect ID: Sets font effect for prompt («Please enter keycode») message.
- Event message text effect ID: Sets font effect for event («Code is correct» or «Code isn't correct») message.
- Key code text effect ID: Sets font effect for numerical combination itself.
- Clear button inactive text ID: Font effect for C (clear) button.
- Enter button inactive text ID: Font effect for > (enter) button.
- Failed message timeout: Timeout before keypad screen will close itself when entered combination is not correct. Set to 0 to immediately close screen (like in TR5).
- Success message timeout: Timeout before keypad screen will close itself when entered combination is correct. Set to 0 to immediately close screen (like in TR5).
Custom background
Patch
created by Harly Wuson
With
this patch you can replace standard monochrome background for inventory,
load/save and options/statistics screens with ANY bitmaps. Moreover,
all bitmap filenames are customized via SCRIPT2.TXT file, so you
can change backgrounds for EACH level! Just use corresponding OptionsScreen,
InventoryScreen, LoadSaveScreen parameters in SCRIPT2.TXT (remember
you must update your aliases.txt
file with latest
version; for detailed parameter explanation, refer to eSSe
scripting reference).
WARNING:
For now, this patch have a serious bug that causes a flickering
of fonts in the bottom part of the screen at resolutions higher
than 800x600. Currently there is no solution for this problem.
WARNING
2: Another serious problem with this patch is that it drastically
slows down some systems. As above, no solution is available for
now.
Enable
loading screens
And another frequently requested feature.
This patch allows you to disable boring loading cameras and
screenshots with TR1-3 and TR5-like pre-rendered bitmap loading
screens! As with previous patch, you can customize loading screen
filename for each level, so it will change with each level! Use
LoadingScreen parameter in SCRIPT2.TXT file to achieve this
(remember you must update your aliases.txt
file with latest
version; for detailed parameter explanation, refer to eSSe
scripting reference).
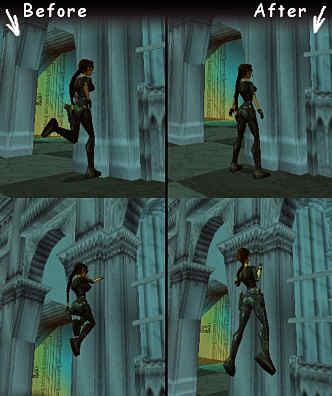
Widescreen
mode option
Patch
developed by Harly Wuson
Adds new «Widescreen» option to setup menu that
allows you to use 16:9 aspect ratio resolutions without nasty squashing
effect. Now, if you'll play TRLE levels on your new widescreen monitor
or TV, there should be no screen deformation and «fat Lara» effect.
To use this option, just go to usual tomb4.exe -setup window,
and you will see one new checkbox:
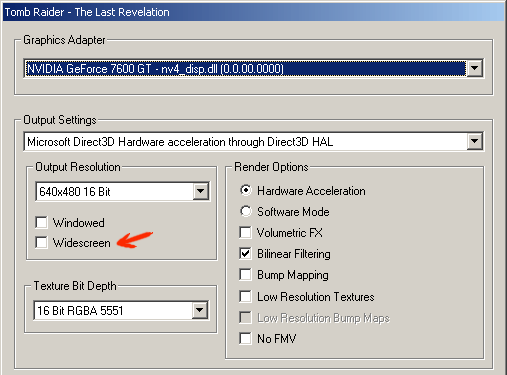
If you still can't understand the meaning of this option, here are two screenshots in 640x400 resolution with and without widescreen option turned on:
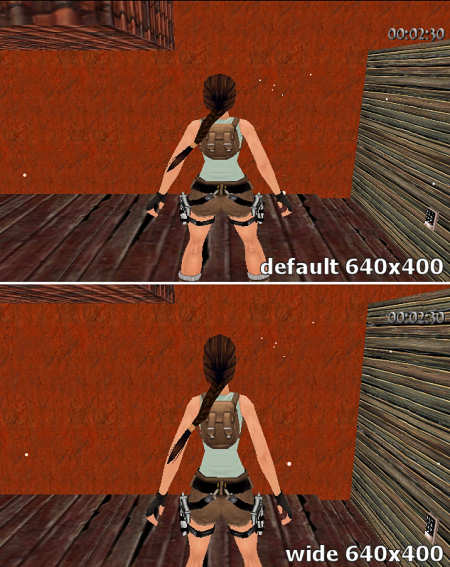
As
you can see, Lara looks squashed on first screenshot, but with
widescreen option turned on, she looks normal.
Enable
flare particle effects
For some reason, TR4 engine lacks
beautiful flare particle effects that were available in TR3. This patch turns on TR3-like fiery flare again. Remember that
you will also get burning flare sound (which changes pitch and volume
depending on game situation — for ex., you won't hear a sound, if
flare is placed underwater, when you're not) and underwater
bubbles (i. e. flares will emit bubbles when underwater).
The
origin of this patch is a very
old TR4 demo,
which inherits some features of TR3. For some reason, in this demo, flare
emitted particles only when it was thrown on the floor, but not
when Lara was holding it in her hand. Indeed, this patch revives
flare particles not only for separate flare objects, but for in-hand
flares too!
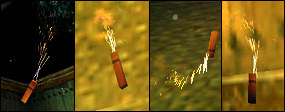
That's
how thrown flare looks in-game.
Parameters:
- Passes (ext): Rendering passes for separate flare objects. More passes will give you more rich particle effects, but remember that particle buffer shouldn't be overflown, so setting amount of passes to 25 or 100 is a very bad idea.
- Passes (int): Rendering passes for in-hand flare. Same as above, but remember that it renders slightly different, so it needs less passes.
- Burining flare sound effect: Sets sound effect for burning flare. By default it's set to SAND_LOOP sound (internal ID #344), which sounds almost similar to TR3 burning flare.
Smooth
shadows
Are you tired of odd octagonal shadows in TR engines?
I suppose yes, because such angular shadows look absolutely ridiculous.
Interesting thing that TR4 engine can render different type of shadows
— look at PlayStation versions of TR3 and TR4, these games use smooth,
textured, rounded shadow instead of usual PC octagon. It is
even more interesting that same TR4 demo
1.0 uses
textured shadow instead of octagonal! But, as with many other great
features, it was ripped from final TR4 version. Now it is time to
get it back:
Rounded
textured shadow turned on. Please note that it still differs from
PS versions and have sharp edges.
Also,
unlike ANY versions of ANY old Tomb Raider games, this shadow will
gradually disappear, if Lara's vertical position increases in relation
to the floor. In other words, shadow will become less noticeable,
if Lara is jumping or hanging on a ledge, and it will completely
disappear at the distance about 3 squares from the floor. Indeed,
it will immediately reappear, if distance between Lara and the floor
decreases.
Now some
information how to achieve such smooth shadow. You
know that DEFAULT_SPRITES contain some unused sprites for inventory
background (they appear in WadMerger as sprites from #19 to #27).
I don't think that someone will use these sprites some day,
so you can put your brand new shadow sprite into this unused slot
and then change sprite ID parameter. Shadow sprite must have magenta
background and contain black circle with SHARP edges (i. e. no antialiasing).
WadMerger will allow you to import sprites up to 127x127, so you
can create very clear and sharp rounded shadow.
Unfortunately,
you can't create PlayStation-like smooth shadows for now, but
there is indeed a possibility to gain smooth shadow anyway.
To do this, you must create shadow sprite as tiny 5x5 magenta square
with ONLY ONE black pixel in the middle. Then set shadow darkness
to maximum in patch's parameters, and you will get nice black smooth
shadow. (Thanks to GeckoKid for this information!)
Parameters:
- Shadow sprite ID: Which sprite should be used to render shadow? Well, by default it is set to one of the lensflare sprites, but this sprite is too small, so you still can see pixels, especially when shadow is stretched. So, as it was said before, you'd better create custom shadow sprite, put it into unused sprite slot and change shadow sprite ID.
- Render type: You can select other render type (for ex., setting it to 6 will give you wireframe shadow).
- RGBA tint: Changes shadow's red-green-blue highlighting. It's not very useful, but can be fun.
- Shadow darkness: shadow's overall blackness. Higher values will give darker shadow. Value of 255 will create pitch-black shadow, and value of 0 will remove shadow completely.
- Vertical position: shadow's position in relation to floor. By default it's set a bit higher than floor itself (value of -16), because setting shadow's position at the same height as floor (i. e. value of 0) will produce Z-fighting problems (simply said, shadow will «flicker» on sloped surfaces).
Fix
disappearing bubbles
This
patch is useful when you have activated flare particle effects patch
and experience problem with disappearing bubbles. It remaps bubble
buffer from 40 to 128, so you will be able to see much more bubbles
at the same time. Also it changes bubble buffer overflow behaviour,
so even if bubble buffer will be completely filled, bubbles won't
disappear suddenly anymore.
Genuine
TR5 static bars
Replaces all TR4 static bars (except loading bar) with genuine gradient TR5 static bars. Unlike native TREP setting, gradient won't squash, if bar value is decreased.
Please note that TR5 bars are placed a bit differently on screen.
Add
copyright notice under main menu
If
you remember early TR4 demos, there were copyright notices under
main title menu. This patch adds same copyright notice under main
menu. You can use any text you want — just edit corresponding
STRINGS2.TXT line. After this, you will get neat copyright message
under title menu:
Remap
scene memory: revamped
TREP
is now 2 years old, and some old extensions are becoming obsolete.
2 years ago it seemed that it's pretty enough to have 4 megabytes
of scene buffer to fit anything TRLE builder may want to. But times
are changing. Newest custom levels (like Teme9's Spanish Galleon
level) are gone beyond standard «Remap scene memory» limits, so
there's now need to extend it even further. This update for «Remap
scene memory» option doubles scene memory buffers, which can prevent crashes when playing newest custom levels with ultra-high detail.
Also this patch reverts forcing of bump-mapping when remap scene memory is on, since this bug is now fixed.
Demo
recorder / player
From
the long history of custom patches, i think, this is the most advanced
and promising patch. Why, you may ask? Well, because it allows you
to record and replay custom demo files! Maybe you remember
that PC versions of TR2 and TR4 demo had something like this,
but of course, these versions supported only playing of Core's
pre-recorded demos. Supposedly, Core used external tool to record
gameplay demos, so there was no chance to record custom user demo
file... But now you can do this! Imagine — now you can record your
walkthroughs (there is possibility to record non-stop multi-level demos without
interrupting recording process), tricks, speedruns (remember all
these QuakeDoneQuick-like projects? Now you can create same thing
with TRLE levels!) and then share
them with all TRLE community! Let others see how you play your favorite
custom levels!
ABSOLUTELY
IMPORTANT WARNING ABOUT DEMOS: Current
demo format is plain simple; it only records player input (i. e.
keys pressed) and Lara's position and speed values. It means that
ANY changes in ANY significant TREP options, like gravity,
enemy HP, weapon settings, static mesh hard collision, spikes /
rollingballs behaviour, and even flare particle effects may result
in CORRUPTED DEMO REPLAY. For example, if you've recorded some
demo with one TREP settings, then re-patched .exe with different
settings and tried to replay your demo, it may result in very weird
glitches, like Lara stumbling into a wall, some enemies being left
behind (although they must've been killed), wrong inventory items
used, etc. Also don't forget that some important TREP settings are
now set via SCRIPT2.DAT file, so wrong SCRIPT2.DAT file also may
cause a mess. So, the gold rule is: always record and play demos
with same .exe or with same TREP preset applied, and also with same
SCRIPT2.DAT file.
ANOTHER
IMPORTANT WARNING: do
not use weapon hotkeys and medkit hotkeys when recording a demo!
Since these hotkeys are not treated by TR4 engine as usual control
keys, their values can't be written into demo file.
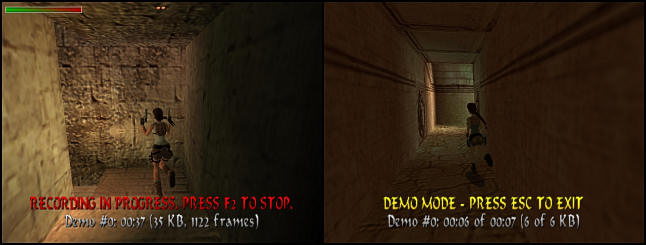
Demo
recorder (left) and demo player (right)
Demo player and recorder will provide you any important information you may need in real-time. Recorder shows you how much time you've already recorded, as well as amount of disk space that is already occupied by your demo and overall amount of frames recorded. Also, in the top part of the screen, you will see small indicator which shows you demo recording buffer status. Demo is written to disk by 8-kilobyte blocks, so this indicator will continously fill and then reset again, when 8 kilobytes limit is reached and data is being written to disk. And demo player simply shows you overall and played demo time and size.
Now a bit information about playing and recording controls. First of all, you must know that you can record your demo in 33 different slots — from 0 to 32. To switch between these slots, you must press F3 (switches to next slot) or SHIFT+F3 (switches to previous slot) either in title flyby or in-game. You will get a quick info about current slot, like this:
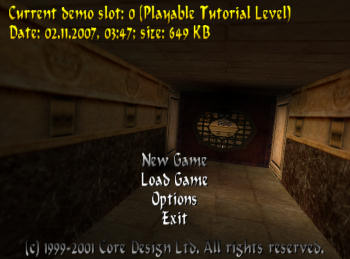
To play demo, press
F4 key either in game or in title flyby. Demo will be immediately
loaded from current slot (if current slot is empty, nothing will
happen) To record demo, press F2 key in game. To stop
recording, press F2 again. Please
be sure that you've selected correct slot for your demo, cause you
can easily overwrite existing file by accidentally pressing F2 key. Note
that, when recording a demo, game will re-initialize itself
to reset some important variables and counters (it will look like
ordinary loading screen, except «GET READY...» message above loading
bar).
All demos will be placed into /demo subdirectory.
If there is no such subdirectory, it will be created automatically.
Each demo sequence consists of three different files: demosave.x,
savegame.x and trepsave.x («x» means number
of demo slot). When distributing your demo files, please be sure
that you've included ALL THREE FILES, because all of them are needed
to play your demos. And don't even try to use demo savegames as
usual savegames, because they're using slightly different file
format to prevent cheating!
Funny fact about demo player: since you can theoretically record whole game walkthroughs, it doesn't stop recording when going into inventory screen and save game screen. When you will replay your demo, you will also see that you've entered inventory or savegame screen, but, as for the latter, IT WILL ONLY LOOK LIKE you've saved your game — actually, since game is in demo mode, no actual data will be written to disk. But BEWARE of entering load game and paused screens when recording! Moreover, NEVER exit to title without stopping demo recording! If you will not stop recording before game will exit to title, something nasty may happen. Also you should immediately stop recording, if Lara is dead (or else game will automatically exit to title, and you will encounter same nasty bug).
In addition to user-controlled
demo player, this patch will enable title menu demo autoplay.
Like in TR2 and PlayStation TR3 versions, game will cyclically play
specified amount of demos, if you haven't pressed any keys in a
timely manner. You already know that classic SCRIPT.TXT contains
unused InputTimeout value, so now this value WILL be used for
this patch.
NOTE: Title autoplay demos aren't using
same slots as ordinary demos! There is a simple fool-protection
method that prevents user from overwriting your demos that you may
bundle with your level — in other words, all title autoplay demos
are using slots 33 and above. That is, if you will use three
different demos for title flyby (it's default value), they should
be placed in /demo subfolder with these names:
|
demosave.33 |
demosave.34 |
demosave.35 |
If you will use more
than 3 demos, then you should use slots 36, 37, and so on. Amount
of title flyby demos to play is specified with Title autoplay
demos amount parameter.
If you don't want to use title
demo autoplay at all, simply set InputTimeout to a VERY BIG value,
like 500000. It means that user will have to wait ~5 hours until
demo autoplay will actually begin, i bet that no one have such large
amount of patience.
Parameters:
- Title autoplay demos amount: changes amount of autoplay demos in title screen.
- Font effect parameters set different font effects for different demo player / recorder labels.
Fix
binoculars bug
If you've
played PlayStation version of TR4, you should remember that, when
you was in the mirror room and binoculars were used, Lara's
reflection was put into binocular state too — her animation changed,
and binoculars meshswap appeared in her hands. In PC version, however,
Lara was in standard standing state, with no traces of binoculars
animation or meshswap. This patch fixes this bug, so, when looking
through binoculars, you will see the same thing as in PS version.
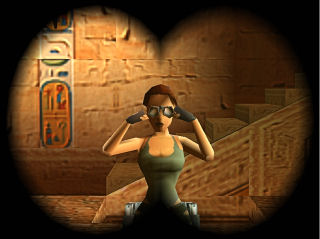
In
this Coastal Ruins mirror room, you now is able to see actual
Lara's binoculars reflection.
PLEASE NOTE that by default animation #441, which is used for binoculars state, is looped on itself! If you will use this patch with unmodified animation #441, it will look like Lara isn't able to move binoculars up and down. So you must edit animation #441 in WadMerger and change next animation number to 103 — up/down binocular controls will be unlocked.
Parameters:
- Meshswap object ID: changes meshswap object that becomes active when Lara is looking through binoculars.
Multiple
vertical / horizontal mirrors
TR4 engine uses
quite simple method of rendering Lara's reflection. It copies all
main Lara parameters (like corrdinates, rotation, animation number
etc.), processes them in a way that reflection moves properly, and
then draws second Lara model, plus executes some secondary effects. For some reason, Core used only one
mirror for single level, despite the fact that reflection drawing
can be repeated infinitely. This patch modifies mirror drawing,
so actually game will now be able to render up to 20 different Lara reflections
in single level.
It overwrites classic SCRIPT.TXT mirror settings completely,
now all mirror parameters are placed in extended SCRIPT2.TXT file.
Read
eSSe reference to learn these new mirror parameters.
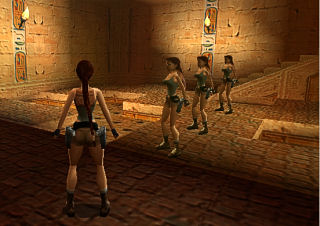
Multiple
reflections in Coastal Ruins
However, it is NOT recommended to place multiple reflections in the same room, because then you may experience various minor glitches (for example, gunflash may disappear in one of the reflections).
Much more desired advantage of this patch is the ability to create up to 50 vertical mirrors. It is extremely useful if you want to make reflecting floors or ceilings in your level:
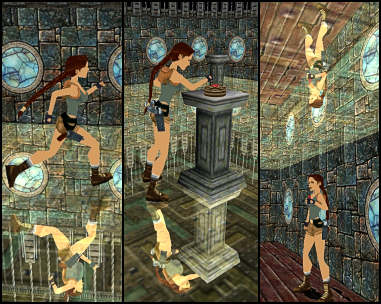
Vertical
reflections include floor and ceiling reflections.
Vertical mirrors are almost the same thing as horizontal mirrors, except that their code processes slightly different parameters, so it looks like Lara is not mirrored horizontally, but vertically. Scripting of vertical mirrors is similar to scripting of horizontal mirrors, but coordinate parameter sets vertical reflection plane position. If reflection plane is equal or larger than Lara's position, then reflection will be rendered UNDER Lara, and if reflection plane is less than Lara's position, it will be rendered ABOVE Lara. Mind that when creating floor and ceiling reflections.
Rotate
camera with right stick
Old Tomb
Raider games were optimized for gamepad controllers by nature, since
primary platform for TR1-TR5 was PlayStation console. So, in my
opinion, the best choice is to play custom levels with some decent gamepad
with two analog sticks. Unfortunately, TR4 was developed at a times
when dual-stick gamepads were rare, so it doesn't support right
stick controls. If you look at newest TR games, like Legend or Anniversary,
you will see that right stick is used to rotate camera around Lara.
This may come in handy in some circumstances — if you want to take
good screenshot, check out what happens behind you, or simply to
get a better control response. This patch turns on right analog
stick on most of dual-stick gamepads, so it will be used to rotate
camera, just like in Anniversary or Legend. Only major difference
is Lara won't change her direction according to camera rotation.
To
restore default camera position (i. e. behind Lara), simply press
LOOK button for one moment — then position will be immediately restored
to default.
NOTE: some users may realize that up/down and
left/right axes on their right analog stick are swapped!
This bug is related to certain gamepad configurations and drivers.
If you can't fix it by changing gamepad settings (some drivers may
allow you to swap axes on low level), then you can simply swap axes
in TR4 options screen. Just go to TR4 options menu, and you will
see new option that will swap gamepad right stick axes:
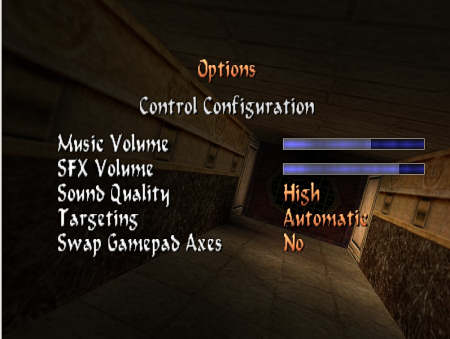
Also note that this patch requires eSSe extended strings file, because text labels for this new option are taken from STRINGS2.TXT file.
Parameters:
- Dead zone: changes right stick's deadzone. You can set it higher, so poorly calibrated or malfunctioning gamepads won't accidentally rotate camera. It is set to 4 by default, which should be enough for most devices.
Cold
breath
Again,
as seen in TR3, enables cold breath functionality. To make it work, you can either set «Cold» room
flag in NGLE or type ColdBreath= ENABLED for corresponding level in SCRIPT2.TXT. In other words,
you have two methods to do it: first — enable cold breath for specific rooms in NGLE, or
second — enable cold breath for whole level with SCRIPT2.TXT. NGLE users will find first method more flexible, but in case you're using DXTre3D or simply don't want to tick Cold button for each room in your project, you can use second method.
Remember
that there is no need to set ColdBreath parameter, if you're using Cold flags in NGLE and, on contrary, there is no need to use such flags if you're using ColdBreath parameter.
Also note that cold breath is synchronized differently with 4 standing animations (103, 110, 222 and 263). If you're using default animations, leave these settings intact. But if you've modified one of these standing animations, you must set cold breath start frame manually, so it will synchronize with actual Lara movement. As for all other animations... Well, there is a little surprise for you: unlike TR3, breathing speed will depend on how fast Lara is moving! So it will look like Lara is breathing faster when, for example, she is sprinting or running, and she will breath very slowly when she's hanging on a ledge or walking.
Parameters:
- Animation 103 start frame: modifies cold breath effect start frame for animation 103 (standing still).
- Animation 110 start frame: modifies cold breath effect start frame for animation 110 (surfacing water).
- Animation 222 start frame: modifies cold breath effect start frame for animation 222 (duck).
- Animation 263 start frame: modifies cold breath effect start frame for animation 263 (on all fours).
- General cycle length: modifies breathing cycle length for all other animations.
- General cycle start frame: changes breathing effect start frame for general breathing cycle.
Cold
breath: bypass animation 103 sync
Bypasses
synchronization of cold breath effect with standing animation. Can
be useful if you have VERY LONG custom standing animation.
Bass.dll
OGG audiotrack playback
![]() Not only this patch replaces TR4
engine's audiotrack format from MS-ADPCM to OGG Vorbis format, but
it completely changes the way audiotracks are played! It uses new external
sound engine called BASS sound library, which is FAR
MORE powerful than built-in TR4 audiotrack playback code. For example,
with this BASS library you now can smoothly fade-out audiotracks
on level loading, you can play several audiotracks simultaneously
(unlike TR4 audiotrack player, which is capable of only playing
one track at a time), you can smoothly fade one track into another,
and many more! For now, this patch offers you these advantages:
Not only this patch replaces TR4
engine's audiotrack format from MS-ADPCM to OGG Vorbis format, but
it completely changes the way audiotracks are played! It uses new external
sound engine called BASS sound library, which is FAR
MORE powerful than built-in TR4 audiotrack playback code. For example,
with this BASS library you now can smoothly fade-out audiotracks
on level loading, you can play several audiotracks simultaneously
(unlike TR4 audiotrack player, which is capable of only playing
one track at a time), you can smoothly fade one track into another,
and many more! For now, this patch offers you these advantages:
- OGG format allows gapless looped playback,
which means that there will be no ugly gap on looped track replay
any more, so you can have Legend-like infinite musics and ambiences.
- OGG format uses one of the best audio compression algotithms, much better than MP3. You can create very small files with decent sound quality.
- Since OGG format is played directly by TR4 engine, there is no need in inbetween audio conversions. In other words — no more start_me.exe is needed.
- Looped and non-looped audiotracks are played in two different streams. In simple words, it means that ambience loops will play without interruptions, because all other music themes will be played in parallel stream (i. e. you will hear both ambience and music tracks playing at the same moment!).
- There are now smooth transitions, when game is switching between two looped tracks. You don't need to fade-out your loop ambience tracks in sound editor anymore, because all fade-ins and fade-outs will be processed by BASS library itself. Also it adds more atmospheric feel to your level, because tracks can fade into each other very slowly, leaving no rude edge between indoor and outdoor zones.
- There will be smooth audiotrack fadeout when you're loading new level.
- When Lara is dead, both audiotracks will stop with fancy «dying turntables» slow-down effect and fadeout.
- You may set-up looped audiotrack damping, so looped track will be temporarily silenced (partly or fully) if non-looped track is also playing.
- Very first looped track in a level starts with a one-shot fade-in, so you can have «infinite» ambience loop with automatic start-up fade-in.
WARNING:
To use this
patch, you must download
BASS library package
and then put bass.dll file from this archive to the same
directory as tomb4.exe, or else game won't work!
WARNING
2: before using
this patch, make sure there is NO .wav files in your /audio folder,
or else TR4 will still play old .wav files and ignore .ogg files!
Parameters:
- Prev looped track fadeout time: sets time (in milliseconds) to fade-out previous looped track (when looped tracks are switching).
- Next looped track fade-in time: sets time (in milliseconds) to fade-in forthcoming looped track (when looped tracks are switching).
- Non-looped track fadeout time: sets time (in milliseconds) to fade-out previous non-looped track (when non-looped tracks are switching)
- Looped track loading fadeout time: sets time (in milliseconds) to fade-out looped track on next level loading.
- Non-looped track loading fadeout time: sets time (in milliseconds) to fade-out non-looped track on next level loading.
- Looped extension hex string: if you want this patch to play looped .mp3 files instead of .ogg files (yeah, you can use MP3 or OGG formats), set it to 2E6F6767.
- Non-looped extension hex string: if you want this patch to play non-looped .mp3 files instead of .ogg files, set it to 2E6F6767 too.
- Looped track damping fadeout time: time (in milliseconds) to fade-out looped track after non-looped track playback is initiated.
- Looped track damping fadeout volume: damping volume. Maximum is 100 (looped track will be comptetely silenced), minimum is 0 (no damping at all).
- Looped track damping fade-in time: time (in milliseconds) to fade-in looped track back again (after non-looped track playback is finished).
- On-death looped fadeout time: time (in milliseconds) to fadeout and slow-down looped track in case Lara is dead.
- On-death non-looped fadeout time: time (in milliseconds) to fadeout and slow-down non-looped track in case Lara is dead.
- Looped level start-up fade-in time: time (in milliseconds) to fade-in very first looped track in each level.
Clear
menu backgrounds
Every
old TR (except TR2, which had textured background) game draws
inventory / load / save / paused screens background in a very dumb
way — it simply captures current game screen, downsamples it to
640x480 resolution and then renders under inventory or whatever
else. It looks OK on consoles and TVs (remember that TR4 engine
is nothing more but direct PlayStation port), but on high-resolution PC
monitors it looks so awful...
This
patch will give you something else. Instead of screen-capturing,
it pauses in-game renderer, but everything remains on screen. Benefits
— of course, no more striped inventory bug, plus inventory background
will be rendered in SAME resolution as current screen resolution!
Also you'll get nice colour tint fade-in, like in PlayStation versions
of the game.
Parameters:
- Blue / Red / Green colour tint: changes overall background colour character.
- Blue / Red / Green tint fade-in speed: changes the speed of each tint colour fade-in speed.
Lara's
Ponytail Position Changer
Patch
created by GeckoKid / Harly Wuson
With
this patch you can freely change both old (1-ponytail) and young
(2-ponytail) Lara's hair position! Theoretically it allows you to
create new outfits with different haircuts and hair placement.
Parameters:
- Adult Lara's X / Y / Z position: changes adult Lara's ponytail X / Y / Z position.
- Young Lara's (left) X / Y / Z position: changes young Lara's left ponytail X / Y / Z position.
- Young Lara's (right) X / Y / Z position: changes young Lara's right ponytail X / Y / Z position.
Add
textbox into SECRET_MAP slot
Allows you to use abandoned
SECRET_MAP slot for universal textbox object, that will generate
specific event, when Lara will press ACTION key in object activation
zone. In simple words, if you've played any of Resident Evil (or
any other CAPCOM) games, you know that usually, when you're pressing
ACTION key nearby some suspicious object, game will return some
text comment, like «It's too dark to see outside the window» or
«It is the painting of an old man» or «Some weird experiments were
done here...», and so on. So, with SECRET_MAP object you now can
create absolutely the same thing! Literally, you can turn whole
TR game into text quest, because you can place LOTS of SECRET_MAP
objects in your level with different text strings assigned to them!
Moreover,
when Lara approaches this object's interaction zone, it will produce
neat tooltip message in the bottom right part of the screen. Text
of this tooltip may change, depending on OCB you've set (see below).
There
are, however, few complications that you must keep in mind
when using SECRET_MAP object.
- OCB codes from 0 to 9999 sets number of STRINGS2.TXT to show, when Lara presses ACTION nearby corresponding SECRET_MAP object. For ex., if you have SECRET_MAP object with OCB 15, it will show string number 16 (because OCB 0 goes for string number 1) from STRINGS2.TXT. Text will show in the bottom part of game screen.
- OCB + 10000 will produce same result as above, but text will show in the center part of the screen. It may be useful if you want to mark importance of your text, or simply if your large text can't fit bottom part of the screen.
- OCB + 20000 will produce same result as (1), but you will see «ACTION — talk» item tooltip instead of default «ACTION — examine» tooltip. It may be very useful, if you're using SECRET_MAP objects not only for item interaction, but also for NPC talks. This way you can also place some static NPCs in your game with SECRET_MAP objects around them, and it will show you proper tooltip message (because it will look odd if game will produce «examine» message with living people, no?).
- OCB + 30000 will produce same result as (2), but with same difference as in (3).
- Negative OCB will produce absolutely different effect. Any negative OCB will result in call-back of corresponding custom flipeffect set in Flipeffect Editor. For example, SECRET_MAP object with OCB -52 will immediately execute flipeffect number 52, if Lara will appear in its activation zone and player will press ACTION. This way you can create some unique interaction zones or objects with different functions (like health chargers, item givers, item activators, level loaders, video / audio players etc.)! Note that flipeffect activated by any SECRET_MAP object won't stop any general flipeffect that is currently activated.
More info about this patch's functionality is given in these forum messages: one, two.
OCB-customizable waterfall mist
Modifies WATERFALL_MIST object using standard OCB field. With this patch, you can create mist objects of ANY size and various colours.
Waterfall mist's OCB should be in format XXYY, where XX - mist size,
and YY - mist colour (colour numbers are COMPLETELY similar to volumetric fog bulb colour
numbers, which you're entering in timer field when changing fog bulb colour). Examples:
0517 — creates small red mist,
3026 — creates extra-huge green mist,
2003 — creates medium-sized sky-blue mist.
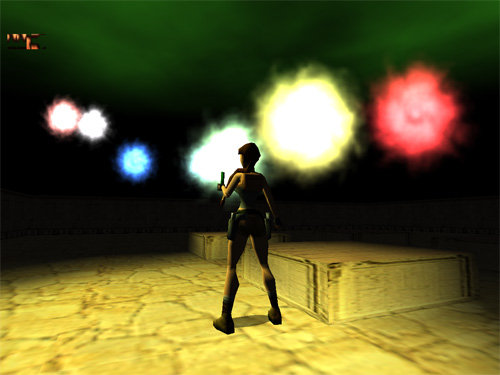
Note that this patch overwrites GFX Customizer's waterfall mist colour and size options, but it DOESN'T overwrite density and amount settings, because I've ran out of OCB capacity (there is way to pack more parameters into OCB, like Core design did, but I suppose no one want to hurt themselves with calculating hexcodes).
OCB-customizable amber light
Amber Light object, along with Blinking Light object, is very popular in TR level building, because these two objects are only dynamic lights in our beloved TR4 engine. But what's the use of it, if you can't customize it?! So now, prepare for REAL DISCO!!! You can freely change light's fading interval, size (radius) and, of course, colour! Imagine dark room with all types of dynamic lights turned on simultaneously... Create dancefloors, alarms of any kind, faint CRT screens blinking, underwater glow, and many more — all with only one simple OCB.
OCB is now in 5-digit format "XXXYZ", where XXX - blinking ratio from 0 (constant glowing) to 127 (shifting strobe), Y - light radius from 0 to 9, and Z - light colour from 0 to 6. Colour numbering IS NOT the same as for waterfall mist bulb, but is similar to TREP's Light Customizer original Amber Light options. If you still feel confused, here is the description:
0 — light-blue (classic Amber Light colour)
1 — green
2 — deep-blue
3 — magenta
4 — yellow
5 — red
6 — white.
Examples of usage:
00122 — create small blue light with very slow blinking effect
12756 — create big white light with funny shifting stroboscope effect (try it, can't describe it well)
02031 — create medium-sized green light which blinks a bit faster than classic amber light.
3.: HOW TO CREATE YOUR OWN CUSTOM PATCHES?
Warning: this section contains NO information about how to research TR4 engine, but only directions for dealing with internal DRACO patch editor.
You don't need any extra software to write DRACO patches, because it already contains built-in patch editor. If you want to use this editor, you must set DRACO module to development mode. To do this, you must click onto small smiley picture in the top right corner of description box (you will note that cursor changed to Mickey's hand) or find line DeveloperMode=0 in trep.cfg and set it to DeveloperMode=1. Then TREP will always start with custom patch development functions enabled!
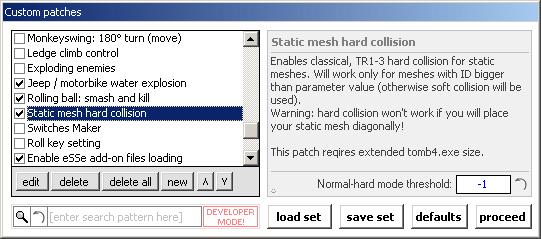
TREP's
custom patch module with developer functions enabled
Now, as described by this picture, you should see additional buttons panel under patch's list.
- edit — allows you to edit selected custom patch
- delete — deletes current custom patch. You WILL NOT be prompted if you want to delete it or not, so press this button carefully.
- delete all — deletes ALL custom patches from the list. You will be prompted if you really want to do this or not.
- new — create new custom patch. If you will press this button, you will be promted to enter new patch's name. Do not use commas in patch's name! Never! Commas are used by TREP to recognize custom patch's settings from preset file, and if you will use comma in patch name, preset file will be corrupted.
- /\ — moves selected custom patch up. You can change patching order by moving each custom patch up or down.
- \/ — moves selected custom patch down. You can change patching order by moving each custom patch up or down.
Now, if you've decided to create new custom patch, pressed new button and entered new patch's name, you should see patch editor window:
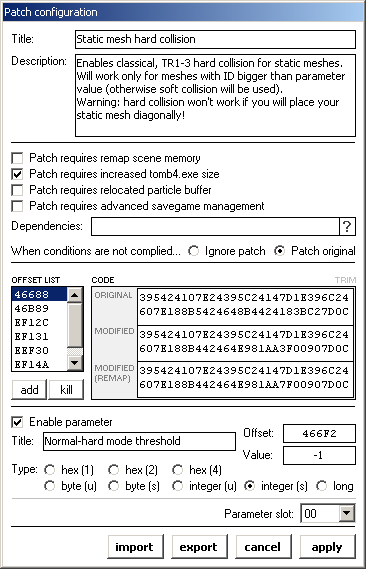
Patch
editor window
Here is the description of each part of editor's window:
- Title — specifies custom patch's name. You can always change your custom patch's name there, but you must note that if patch's name changed, previous patch's version settings won't be loaded from preset file and you will need to re-enter your settings again and create preset again.
- Description — short description of your patch.
- «Patch requires remap scene memory» checkbox — if your patch requires this option (like Tomo's weather patch), you must turn on this checkbox, so if user haven't enabled this option, custom patch will not be written.
- «Patch requires increased tomb4.exe size» checkbox — if your patch uses extended tomb4.exe section, you must use this option. Usage same as above.
- «Patch requires relocated particle buffer» checkbox — same as above, but for «Remap particle buffer» option.
- «Patch requires advanced savegame management» checkbox — as above, but for «Advanced savegame management» option.
- Dependencies — here you can specify names of already existing patches that are required for your new patch. You can specify multiple custom patch names seperated by commas WITHOUT spaces. You must enter each custom patch's name exactly as it appears in custom patch list.
- When conditions are not complied... — what to do if some of listed requirements and dependencies are not complied?
- Ignore patch — simply ignore patch and don't write anything to executable. You must use this option VERY carefully, because since user have enabled your patch, he won't be able to disable it again!
- Patch original — patch original data (see further for description of ORIGINAL and MODIFIED text fields). This option commonly used in almost all existing custom patches. That is, if user have disabled this custom patch or some requirements did not match, TREP will write default, original (non-modified) data.
Offsets and codes
Next goes big part of
editor's window which consists of so-called OFFSET LIST (left)
and three CODE textboxes. Offset list used to specify
offsets for your custom patch data. For example, if you want to
write some patch at offset 2E5E1, you must press add button
and enter this offset. Remember that tomb4.exe's offsets are
not equal to OllyDbg offsets and such. You must substract 400000
from OllyDbg's offset to get real file's offset. This difference
in «real» and «virtual memory» offset called
Relative Virtual Address (shortly called RVA) in low-level programming
terms.
You can delete already existing offsets by pressing
kill button. Also you can edit each offset by selecting it
from the list and pressing right mouse button.
Next goes description
of CODE section. For each offset there can be three different
hexadecimal codes that are used in different circumstances. First
— ORIGINAL — is the original, non-modified code used for
resetting patch data to default. You must enter here default tomb4.exe's
code that you're replacing by your patch. Second text field —
MODIFIED — used for specifying modified hex code (i. e. your
patched code).
Next text field — MODIFIED (REMAP) — is
a bit more complicated. You may ask — «why there are two different
MODIFIED hex codes in some custom patches?» — and here is the
answer. Roots of this problem lies in «Remap scene memory»
option from main TREP's window. This option changes internal TR4
memory structure, so all addresses in your custom patch must be
corrected. To know more about dealing with these two MODIFIED code
fields, refer to DRACO Custom Patch Reference bundled with
each TREP's package.
- TRIM — this gray option above CODE textboxes used to quickly remove all spaces, carriage return and line feed symbols from all your hexcodes. This option is VERY useful if you're directly importing hexcodes from OllyDbg, since OllyDbg generates hexcode with spaces and CR/LF symbols, which is not applicable for TREP's write file functions.
Parameters
Parameters are dynamic values that you can change in tomb4.exe file to get different results. About 90% of all TREP's options are such parameters that you can change in any way you want. So DRACO module also contains support for 9 different parameters per each patch. Each parameter occupies one parameter slot (see Parameter slot combobox in the bottom part of patch editor).
- Enable parameter — enables parameter for current parameter slot. It means that this parameter will be functional and will be written into executable.
- Title — specifies parameter's title (description). It will appear as parameter's description label in custom patches window.
- Offset — enter your parameter's offset here (hexadecimal only!)
- Value — default value for your parameter. This value will be written to executable if user disabled your custom patch or have resetted parameter's value to default.
- Type — specifies value type for your parameter.
***
DRCMerger is DRACO module's front-end. This small tool intended for merging one custom patch set file (usually called patches.drc) into another. It can copy patches from one custom patch set file to another, and also delete and move them. This can be useful if, for example, you have downloaded two different patch sets from different people, and you want to collect all patches in single patch set file. That's where DRCMerger steps in:
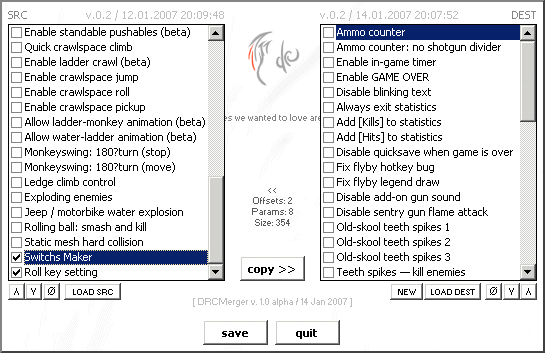
DRCMerger
window
Basically, DRCMerger's interface is similar to FexMerger or WADMerger interface — it has two separate lists and separate controls for source (shortly called SRC) and destination (DEST) patch set files. When you've loaded source and destination files (with LOAD SRC and LOAD DEST buttons), you can begin to copy patches from source to destination patch set.
Note that patches that you've selected in the left part of the window will be copied into right part of the window. To copy selected patches, simply press copy >> button. If you will try to copy patch with the same name, DRCMerger will ask you if it should overwrite this patch or skip it.
Also, like in TPascal's FexMerger, you can select patches in right part of the window, and when you will press copy >> button, all patches that were selected in right list, will be deleted.
When you're clicking on ANY custom patch in right or left list, DRCMerger will show you small fading-in info box with amount of offsets, parameters and raw patch size in bytes. Another useful info is placed on top of each patch list — it tells you current source/destination files' version, date and time.
In both lists, you can move patches up (/\ buttons) or down (\/ buttons), as well as reset all selected patches (with slashed zero buttons). Optionally, instead of loading destination patch set, you can create new destination patch set file from scratch with NEW button (in this case you should delete dummy Empty patch entry afterwards).
After you've ended merging patches, you can save it with corresponding button.
|
TREP is freeware and not a registered trademark and is not protected by any moronic copyright laws. |